Automated Annotation
vak lets you automate annotation of vocalizations with neural networks.
This tutorial walks you through how you would do that, using an example dataset.
When we say annotation, we mean the the kind produced by a software tool
that researchers studying speech and animal vocalizations use,
like Praat
or Audacity.
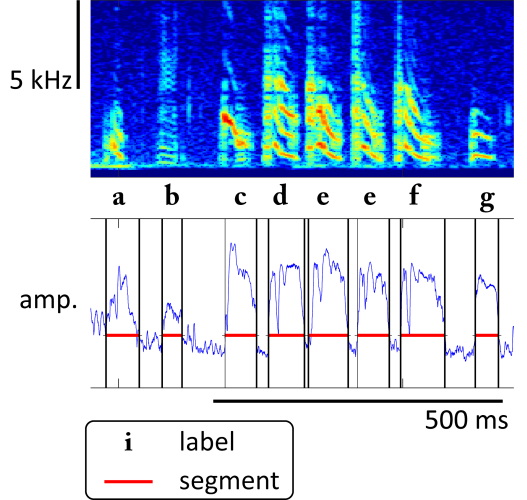
Typically the annotation consists of a file that specifies segments defined by their onsets, offsets, and labels.
Below is an example of some annotated Bengalese finch song, which is what we’ll use for the tutorial.
Hint
vak has built-in support for widely-used annotation formats.
Even if your data is not annotated with one of these formats,
you can use vak by converting your annotations to a simple .csv format
that is easy to create with Python libraries like pandas.
For more information, please see:
How do I use my own vocal annotation format?
The tutorial is aimed at beginners: you don’t need to know how to code.
To work with vak you will use simple configuration files that you run from the command line.
If you’re not sure what is meant by “configuration file” or “command line”,
don’t worry, it will all be explained in the following sections.
Set-up
Before going through this tutorial, you’ll need to:
Have
vakinstalled (following these instructions).Have a text editor to change a few options in the configuration files such as sublime, gedit, or notepad++
Download example data from this dataset: https://figshare.com/articles/Bengalese_Finch_song_repository/4805749
one day of birdsong, for training data (click to download)
https://figshare.com/ndownloader/files/41668980another day, to use to predict annotations (click to download)
https://figshare.com/ndownloader/files/41668983Be sure to extract the files from these archives! Please use the program “tar” to extract the archives, on either macOS/Linux or Windows. Using other programs like WinZIP on Windows can corrupt the files when extracting them, causing confusing errors. Tar should be available on newer Windows systems (as described here).
Alternatively you can copy the following command and then paste it into a terminal to run a Python script that will download and extract the files for you.
Download the corresponding configuration files (click to download):
gy6or6_train.toml,gy6or6_eval.toml, andgy6or6_predict.toml
Hint
The config files in this tutorial use options that make the tutorial run faster, so you can quickly get acquainted with the steps to using vak; these options will not necessarily give you the best performing models. Click the following link to download a config file for training models that modifies and adds options to improve performance.
The main change is the increase in window size.
For more detail on increasing window size,
see this project:
https://github.com/vocalpy/Nicholson-Cohen-SfN-2023-poster.
For more information on other options that are added or changed,
please see the comments in the file.
Overview
There are five steps to using vak to automate annotating vocalizations
prepare a training dataset, from a small annotated dataset of vocalizations
train a neural network with that dataset
evaluate the trained model with a held-out dataset
prepare a prediction dataset of unannotated data
use the trained network to predict annotations for the prediction dataset
Before doing that, you’ll need to know a little bit about working with the shell,
since that’s the main way to work with vak without writing any code.
You will enter commands into the shell to run vak; this is called the
“command line interface”. The next section introduces the command line.
0. Use of vak from the command line
To use the command-line interface to vak you will open a program on your computer
that has a name like “terminal”, where you can run programs using the shell.
It will look something like this:
Basically any time you run vak, what you type at the prompt
will have the following form:
vak command config.toml
where command will be an actual command, like prep, and config.toml
will be the name of an actual configuration file, that let you configure
how a command will run.
To see a list of available commands when you are at the command line, you can say:
vak --help
The .toml files are set up so that each section corresponds to one
of the commands. For example, there is a section called [PREP] where you
configure how vak prep will run.
Each section consists of option-value pairs, i.e. names of option set to the values you assign them.
For example, here is the [PREP] section from the configuration file
downloaded for training.
# PREP: options for preparing dataset
[vak.prep]
# dataset_type: corresponds to the model family such as "frame classification" or "parametric umap"
dataset_type = "frame classification"
# input_type: input to model, either audio ("audio") or spectrogram ("spect")
input_type = "spect"
# data_dir: directory with data to use when preparing dataset
data_dir = "/PATH/TO/FOLDER/gyor6/032212"
# output_dir: directory where dataset will be created (as a sub-directory within output_dir)
(The files are in .toml format;
for this tutorial we will explain
anything specific about that format
you might need to know.)
Now that you know how to call vak from the command line, we’ll walk through the first example
of modifying a configuration file and then using it to prep a dataset.
1. Preparing a training dataset
To train a neural network how to predict annotations,
you’ll need to tell vak where your dataset is.
Do this by opening up the gy6or6_train.toml file and changing the
value for the data_dir option in the [PREP] section to the
path to wherever you downloaded the training data on your computer.
The options you need to change in the configuration files have a dummy value in capital letters to help you pick them out, like so:
# PREP: options for preparing dataset
[vak.prep]
# dataset_type: corresponds to the model family such as "frame classification" or "parametric umap"
dataset_type = "frame classification"
# input_type: input to model, either audio ("audio") or spectrogram ("spect")
input_type = "spect"
# data_dir: directory with data to use when preparing dataset
data_dir = "/PATH/TO/FOLDER/gyor6/032212"
# output_dir: directory where dataset will be created (as a sub-directory within output_dir)
output_dir = "/PATH/TO/FOLDER/prep/train"
Change the part of the path in capital letters to the actual location on your computer:
[vak.prep]
dataset_type = "frame classification"
input_type = "spect"
# we change the next line
data_dir = "/home/users/You/Data/vak_tutorial_data/032212"
Note
Notice that paths are enclosed in quotes; this is required
for paths or any other string (text) in a toml file. If you
get an error message about the toml file, check that
you have put quotes around the paths.
Note
Note also that you can write paths with just forward slashes,
even on Windows platforms! If you are on Windows,
you might be used to writing paths in Python with two
backwards slashes, like so: 'C:\\Users\\Me\\Data',
or placing an r in front of text strings representing paths, like
r'C:\Users\Me\Data'.
To make paths easier to type and read, we work with them
using the pathlib library:
https://realpython.com/python-pathlib/.
There is one other option you need to change, output_dir
that tells vak where to save the file it creates that contains information about the dataset.
output_dir = "/home/users/You/Data/vak_tutorial_data/vak/prep/train"
Make sure that this a directory that already exists on your computer,
or create the directory using the File Explorer or the mkdir command from the command-line.
After you have changed these two options (we’ll ignore the others for now), you can run the command in the terminal that prepares datasets:
vak prep gy6or6_train.toml
Notice that the command has the structure we described above, vak command config.toml .
When you run prep, vak converts the data from data_dir into a special dataset file, and then
automatically adds the path to that file to the [TRAIN] section of the config.toml file, as the option
csv_path.
You have now prepared a dataset for training a model! You’ll probably have more questions about how to do this later, when you start to work with your own data. When that time comes, please see the how-to page: How do I prepare datasets of annotated vocalizations for use with vak?. For now, let’s move on to training a neural network with this dataset.
2. Training a neural network model
Now that you’ve prepared the dataset, you can train a neural network with it.
In this example we will train TweetyNet,
a neural network architecture that annotates vocalizations
(see: https://github.com/yardencsGitHub/tweetynet ).
As of version 1.0, TweetyNet is built into vak.
Before we start training, there is one option you have to change in the [TRAIN] section
of the config.toml file, root_results_dir,
which tells vak where to save the files it creates during training.
It’s important that you specify this option, so you know
where to find those files when we need them below.
root_results_dir = "/home/users/You/Data/vak_tutorial_data/vak/train/results"
Here it’s fine to use the same directory you created before, or make a new one if you prefer to keep the
training data and the files from training the neural network separate.
vak will make a new directory inside of root_results_dir to save the files related to training
every time that you run the train command.
Note
If you are not using a computer with a specialized GPU for training neural networks,
you’ll need to change one more option in the .toml configuration file.
Please change the value for the option device in the [TRAIN] section from
cuda to cpu, to avoid getting an error about “CUDA not available”.
Using a GPU can speed up training, but in practice we find it is quite possible
to train models for annotation on a CPU,
with training times ranging from a couple hours to overnight.
To train a neural network, you run this command in the shell:
vak train gy6o6_train.toml
You will see output to the console as the network trains. The options in the [TRAIN] section of
the config.toml file tell vak to train until the error (measured on a separate “validation” set)
has not improved for four epochs (an epoch is one iteration through the entire training data).
If you let vak train until then, it will go through roughly ten epochs (~2 hours on an Ubuntu machine with
an NVIDIA 1080 Ti GPU).
You can also just stop after one epoch if you want to go through the rest of the tutorial. The [TRAIN] section
options also specify that vak should save a “checkpoint” every epoch, and we need to load our trained network
from that checkpoint later when we predict annotations for new data.
3. Evaluating a trained model
An important step when using neural network models is to evaluate the model’s performance on a held-out dataset that has never been used during training, often called the “test” set.
Here we show you how to evaluate the model we just trained.
This part requires you to find paths to files saved by vak.
There’s four you need. Three of them will be in the results directory
created by vak when you ran train. If you replaced the dummy path in
capital letters in the config file, but kept the rest of the path,
then this will be a location with a name like
/PATH/TO/DATA/vak/train/results/results_{timestamp},
where PATH/TO/DATA/ will be replaced with a path on your machine,
and where {timestamp} is an actual time in the format yymmdd_HHMMSS
(year-month-day hour-minute-second).
The first path you need is the checkpoint_path. This is the full
path, including filename, to the file that contains the weights (also known as parameters)
of the trained neural network, saved by vak.
There will be a directory inside the results_{timestamp} directory
with the name of the trained model, TweetyNet,
and inside that sits a checkpoints directory that has the actual file you want.
Typically there will be two checkpoint files, one named just checkpoint.pt that is
saved intermittently as a backup,
and another that is saved only when accuracy on the
validation set improves, named max-val-acc-checkpoint.pt.
If you were to use the max-val-acc-checkpoint.pt then the path would end
with TweetyNet/checkpoints/max-val-acc-checkpoint.pt.
checkpoint_path = "/home/users/You/Data/vak_tutorial_data/vak_output/results_{timestamp}/TweetyNet/checkpoints/max-val-acc-checkpoint.pt"
In some cases, a max-val-acc-checkpoint.pt may not get saved;
this depends on the options for training and non-deterministic factors like
the randomly initialized weights of the network.
For the purposes of completing this tutorial, using either checkpoint is fine.
The second path you want is the one to the file containing the labelmap.
The labelmap is a Python
dictionary that maps the labels from your annotation to a set of consecutive integers, which
are the outputs the neural network learns to predict during training. It is saved in a .json
file in the root results_{timestamp} directory.
labelmap_path = "/home/users/You/Data/vak_tutorial_data/vak_output/results_{timestamp}/labelmap.json"
The third and last path you need is the path to the file containing a saved spect_scaler.
The SpectScaler represents a transform
applied to the data that helps when training the neural network.
You need to apply the same transform to the new
data for which you are predicting labels–otherwise the accuracy will be impaired.
Note that the file does not have an extension. (In case you are curious,
it’s a pickled Python object saved by the joblib library.)
This file will also be found in the root results_{timestamp} directory.
spect_scaler = "/home/users/You/Data/vak_tutorial_data/vak_output/results_{timestamp}/SpectScaler"
The last path you need is actually in the TOML file that we used
to train the neural network: the dataset path.
You should copy that path option exactly as it is
and then paste it at the bottom of the [vak.eval.dataset] table
in the configuration file for evaluation.
[vak.eval.dataset]
# copy the dataset path from the train config file here;
# we will use the "test" split from that dataset, that we already prepared
path = "/home/users/You/Data/vak_tutorial_data/vak/prep/train/dataset_prepared_20240811"
We do this instead of preparing another dataset,
because we already created a test split when we ran
vak prep with the training configuration.
This is a good practice, because it helps ensure
that we do not mix the training data with the test data;
vak makes sure that the data from the data_dir option
is placed in two separate splits, the train and test splits.
Once you have prepared the configuration file as described, you can run the following in the terminal:
vak eval gy6o6_eval.toml
You will see output to the console as the network is evaluated.
Notice that for this model we evaluate it with and without
post-processing transforms that clean up the predictions
of the model.
The parameters of the post-processing transform are specified
with the post_tfm_kwargs option in the configuration file.
You may find this helpful to understand factors affecting
the performance of your own model.
4. Preparing a prediction dataset
Next you’ll prepare a dataset for prediction. The dataset we downloaded has annotation files with it,
but for the sake of this tutorial we’ll pretend that they’re not annotated, and we instead want to
predict the annotation using our trained network.
Here we’ll use the other configuration file you downloaded above, gy6or6_predict.toml.
We use a separate file with a [PREDICT] section in it instead of a [TRAIN] section, so that
vak knows the dataset it’s going to prepare will be for prediction–i.e., it figures this out
from the name of the section present in the file.
Just like before, you’re going to modify the data_dir option of the
[PREP] section of the config.toml file.
This time you’ll change it to the path to the directory with the other day of data we downloaded.
[vak.prep]
data_dir = "/home/users/You/Data/vak_tutorial_data/032312"
And again, you’ll need to change the output_dir option
to tell vak where to save the file it creates that contains information about the dataset.
output_dir = "/home/users/You/Data/vak_tutorial_data/vak_output"
This part is the same as before too: after you change these options,
you’ll run the prep command to prepare the dataset for prediction:
vak prep gy6or6_predict.toml
As you might guess from last time, vak will make files for the dataset and a .csv file that points to those,
and then add the path to that file as the option csv_path in the [PREDICT] section of the config.toml file.
5. Using a trained network to predict annotations
Finally you will use the trained network to predict annotations.
This is the part that requires you to find paths to files saved by vak.
There’s three you need. These are the exact same paths we used above
in the configuration file for evaluation, so you can copy them from that file.
We explain them again here for completeness.
All three paths will be in the results directory
created by vak when you ran train. If you replaced the dummy path in
capital letters in the config file, but kept the rest of the path,
then this will be a location with a name like
/PATH/TO/DATA/vak/train/results/results_{timestamp},
where PATH/TO/DATA/ will be replaced with a path on your machine,
and where {timestamp} is an actual time in the format yymmdd_HHMMSS
(year-month-day hour-minute-second).
The first path you need is the checkpoint_path. This is the full
path, including filename, to the file that contains the weights (also known as parameters)
of the trained neural network, saved by vak.
There will be a directory inside the results_{timestamp} directory
with the name of the trained model, TweetyNet,
and inside that sits a checkpoints directory that has the actual file you want.
Typically there will be two checkpoint files, one named just checkpoint.pt that is
saved intermittently as a backup,
and another that is saved only when accuracy on the
validation set improves, named max-val-acc-checkpoint.pt.
If you were to use the max-val-acc-checkpoint.pt then the path would end
with TweetyNet/checkpoints/max-val-acc-checkpoint.pt.
checkpoint_path = "/home/users/You/Data/vak_tutorial_data/vak_output/results_{timestamp}/TweetyNet/checkpoints/max-val-acc-checkpoint.pt"
In some cases, a max-val-acc-checkpoint.pt may not get saved;
this depends on the options for training and non-deterministic factors like
the randomly initialized weights of the network.
For the purposes of completing this tutorial, using either checkpoint is fine.
The second path you want is the one to the file containing the labelmap.
The labelmap is a Python
dictionary that maps the labels from your annotation to a set of consecutive integers, which
are the outputs the neural network learns to predict during training. It is saved in a .json
file in the root results_{timestamp} directory.
labelmap_path = "/home/users/You/Data/vak_tutorial_data/vak_output/results_{timestamp}/labelmap.json"
The third and last path you need is the path to the file containing a saved spect_scaler.
The SpectScaler represents a transform
applied to the data that helps when training the neural network.
You need to apply the same transform to the new
data for which you are predicting labels–otherwise the accuracy will be impaired.
Note that the file does not have an extension. (In case you are curious,
it’s a pickled Python object saved by the joblib library.)
This file will also be found in the root results_{timestamp} directory.
spect_scaler = "/home/users/You/Data/vak_tutorial_data/vak_output/results_{timestamp}/SpectScaler"
After adding the paths to these files generated during training,
you can specify an output_dir where the predicted annotations are saved.
The annotations are saved as a .csv file created by a separate software tool
for dealing with annotations, crowsetta. You can also specify the name
of this .csv file. For this tutorial, you can modify both so that
they point to the place where prep put the dataset it created for
predictions, just to have everything in one place.
output_dir = "/home/users/You/Data/vak_tutorial_data/vak/prep/predict"
annot_csv_filename = "gy6or6.032312.annot.csv"
Note
Here, just as above for training, if you’re not using a computer with a GPU,
you’ll want to change the option device in the [PREDICT] section
of the .toml configuration file from cuda to cpu.
Finally, after adding these paths,
you can run the predict command to generate annotation files from the labels
predicted by the trained neural network.
vak predict gy6or6_predict.toml
That’s it! With those five simple steps you can train neural networks, evaluate the train models, and then use the trained networks to predict annotations for vocalizations.